Sharing Your Outlook Calendar: A Complete Information
Associated Articles: Sharing Your Outlook Calendar: A Complete Information
Introduction
With nice pleasure, we’ll discover the intriguing subject associated to Sharing Your Outlook Calendar: A Complete Information. Let’s weave attention-grabbing data and supply contemporary views to the readers.
Desk of Content material
Sharing Your Outlook Calendar: A Complete Information
Microsoft Outlook’s calendar is a strong instrument for private {and professional} group. However its true potential is unlocked while you share it with others. Whether or not it’s good to coordinate schedules with colleagues, relations, or shoppers, sharing your Outlook calendar simplifies the method and enhances collaboration. This text offers a complete information to sharing your Outlook calendar, masking varied situations and addressing potential challenges.
Understanding Sharing Choices:
Earlier than diving into the specifics, it is essential to know the completely different ranges of calendar sharing out there in Outlook:
-
Availability Solely: This selection exhibits solely your busy/free standing, with out revealing particular appointments or particulars. It is superb for sustaining privateness whereas nonetheless permitting others to schedule conferences with out conflicting together with your commitments.
-
Restricted Particulars: This provides a extra detailed view, exhibiting appointment topics however not the content material of the appointments. This offers a stability between privateness and data sharing.
-
Full Particulars: This grants full entry to your calendar, together with appointment particulars, areas, and contributors. Use this selection solely with people you utterly belief.
The extent of entry you grant considerably impacts the privateness of your schedule, so select properly.
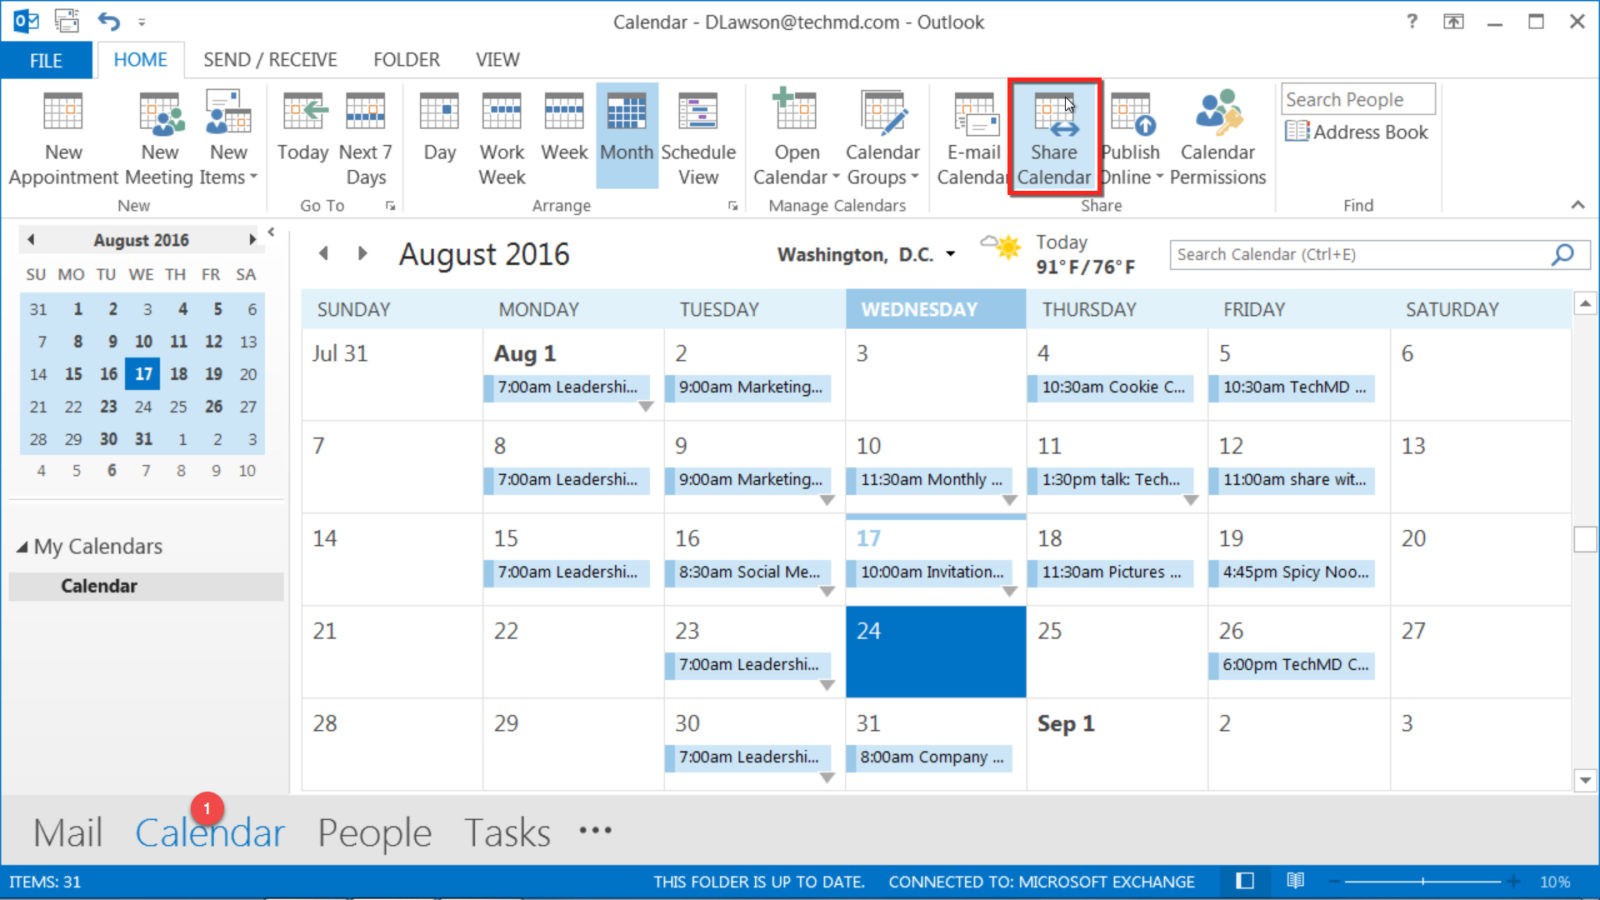
Sharing Your Outlook Calendar: Step-by-Step Information (Desktop Utility)
The method of sharing your calendar differs barely relying on whether or not you are utilizing the Outlook desktop utility, the net model (Outlook on the internet), or a cellular app. We’ll start with the desktop utility, because it provides essentially the most complete management.
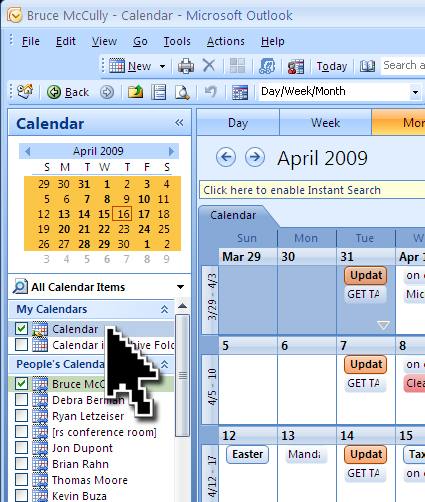
1. Accessing Calendar Sharing Settings:
- Open your Outlook desktop utility.
- Navigate to your calendar.
- Proper-click on the calendar you want to share (often your major calendar).
- Choose "Properties."
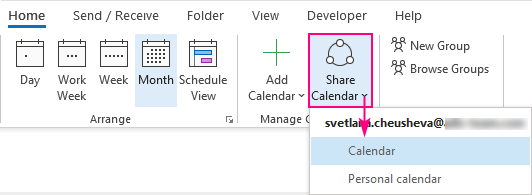
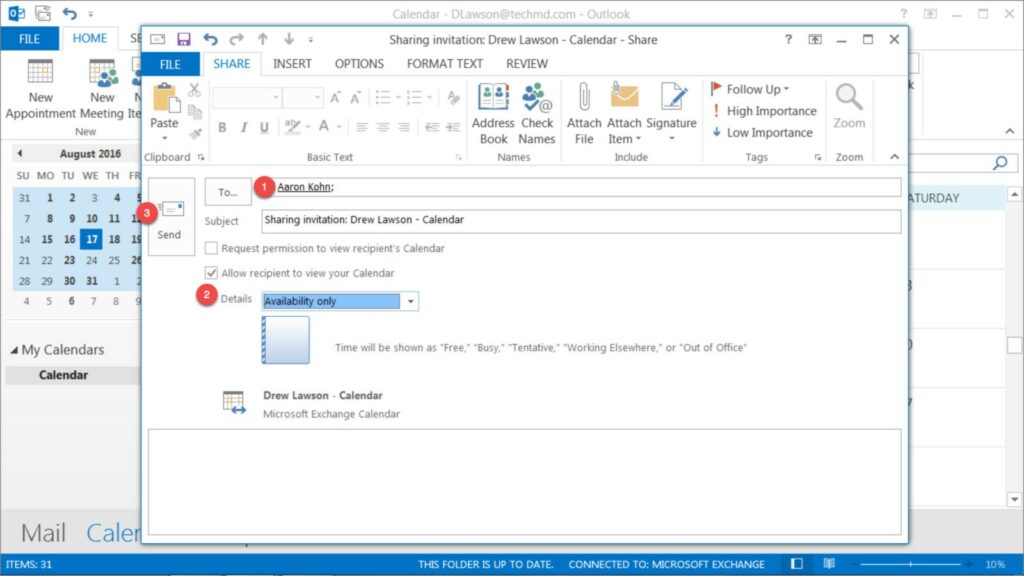
2. Selecting Sharing Permissions:
- Within the "Properties" window, navigate to the "Permissions" tab.
- Click on "Add…" so as to add the particular person or group you want to share your calendar with. You possibly can add particular person e mail addresses or distribution lists.
- As soon as added, choose the person from the listing.
- Select the permission stage:
- Reviewer: Can solely view your calendar; they can’t make modifications. That is equal to "Availability Solely" or "Restricted Particulars," relying in your additional settings.
- Editor: Can view and modify your calendar, together with including, deleting, and modifying appointments. That is typically equal to "Full Particulars."
- Free/Busy Solely: This limits entry to solely your availability data. That is essentially the most personal choice.
- Click on "OK" to save lots of the modifications.
3. Specifying Element Stage (for Reviewer/Editor):
Whereas selecting Reviewer or Editor units a common permission stage, you may additional refine the extent of element shared. That is essential for controlling privateness whereas nonetheless permitting collaboration. After setting the permission stage, you may customise the element stage for every person. Inside the "Permissions" tab, you may see choices to specify what data is revealed.
- Availability Solely: Exhibits solely your busy/free time slots.
- Restricted Particulars: Exhibits appointment topics however hides detailed data.
- Full Particulars: Reveals all appointment data.
Bear in mind to click on "OK" to save lots of your modifications after adjusting the element stage.
4. Sending an Electronic mail Notification (Non-compulsory):
Outlook often robotically notifies the particular person you’ve got shared your calendar with. Nevertheless, you may manually ship an e mail explaining the sharing association and any related directions.
Sharing Your Outlook Calendar: Outlook on the Net (OWA)
The method of sharing your calendar via Outlook on the internet is barely completely different however equally simple.
1. Accessing Calendar Sharing Settings:
- Open Outlook on the internet (outlook.workplace.com).
- Navigate to your calendar.
- Click on the gear icon (Settings) within the higher proper nook.
- Choose "View all Outlook settings."
- Underneath "Calendar," click on "Shared calendars."
2. Including a Shared Calendar:
- Click on "Add calendar."
- Enter the e-mail handle of the particular person you want to share your calendar with.
- Select the permission stage (Free/Busy, Restricted Particulars, or Full Particulars). OWA does not supply the granular "Reviewer" and "Editor" distinction of the desktop utility.
- Click on "Add."
3. Managing Current Shared Calendars:
This part permits you to handle present shared calendars, eradicating entry or altering permission ranges as wanted.
Sharing Your Outlook Calendar: Cell Apps
The tactic for sharing your calendar via cellular apps (Outlook for iOS or Android) is usually much less detailed than the desktop or internet variations. The exact steps might differ barely relying in your working system and app model, however typically, you may have to entry your calendar settings, discover a "Share" or "Permissions" choice, after which add the recipient’s e mail handle and select a permission stage. These cellular apps typically supply solely primary sharing choices, often limiting entry to "Availability Solely" or "Restricted Particulars."
Troubleshooting Frequent Points:
- Recipient Cannot See the Calendar: Double-check that you have entered the proper e mail handle and that the recipient has accepted the sharing invitation (if relevant). Guarantee they’ve added your shared calendar to their Outlook.
- Incorrect Permission Stage: Confirm the permission stage you’ve got granted. If they’ve restricted entry and want extra, modify the settings accordingly.
- Calendar Not Syncing: Be sure that the recipient’s Outlook is correctly configured and syncing with their e mail account. Community connectivity points may also trigger synchronization issues.
- Privateness Issues: At all times rigorously take into account the extent of element you share. Keep away from sharing delicate data, and use the "Availability Solely" or "Restricted Particulars" choices at any time when potential to guard your privateness.
Finest Practices for Calendar Sharing:
- Be Conscious of Privateness: Solely share data you are snug with others seeing.
- Use Clear Topic Strains: Make your appointment topics descriptive to supply context with out revealing delicate particulars.
- Often Assessment Permissions: Periodically assessment who you’ve got shared your calendar with and modify permissions as wanted.
- Talk Clearly: Inform recipients concerning the function of sharing your calendar and any expectations relating to its use.
- Think about Utilizing Classes: Use classes to color-code appointments and make it simpler for others to know your schedule at a look.
Sharing your Outlook calendar can considerably enhance communication and collaboration. By following these steps and greatest practices, you may successfully share your schedule whereas sustaining your privateness and maximizing productiveness. Bear in mind to decide on the suitable sharing stage based mostly in your wants and your relationship with the recipient.


![How to Stop Sharing Calendar in Outlook [PC/Web/Mobile]](https://10pcg.com/wp-content/uploads/how-to-stop-sharing-calendar-in-outlook.png)
Closure
Thus, we hope this text has offered worthwhile insights into Sharing Your Outlook Calendar: A Complete Information. We thanks for taking the time to learn this text. See you in our subsequent article!